What Are Behaviors?
Behaviors are how you bring your game objects to life. Every object in your game (your player, enemies, coins, walls) can have its own set of behaviors that tell it what to do.
Think of it like giving instructions to a robot. Each behavior is one simple instruction, like “listen for a key press” or “move to the right.” On their own, these instructions don’t do much. But when you connect them together, you can build anything: a player that runs and jumps, enemies that chase you, coins that add to your score, doors that open with keys.
The best part? You don’t need to type any code. You build all your game logic by dragging blocks onto a workspace and drawing lines between them.
Opening the Behavior Editor
To add behaviors to an object:
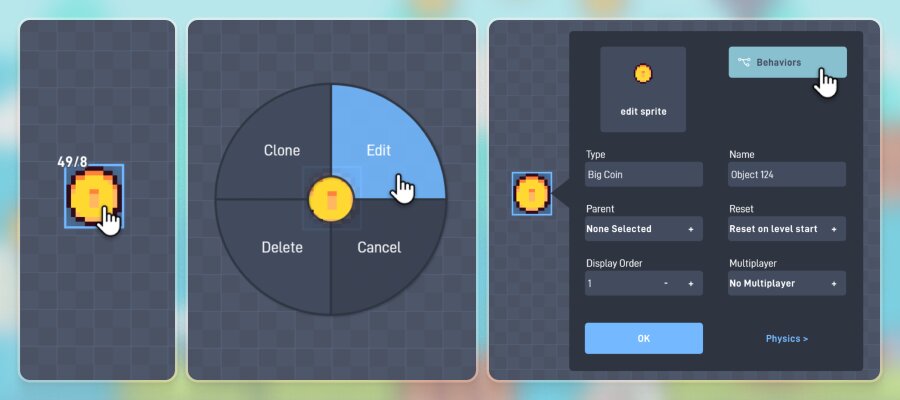
- Click on any game object in your level
- Select “Edit” to open that object’s edit panel
- Click the “Behaviors” button to open the behavior editor
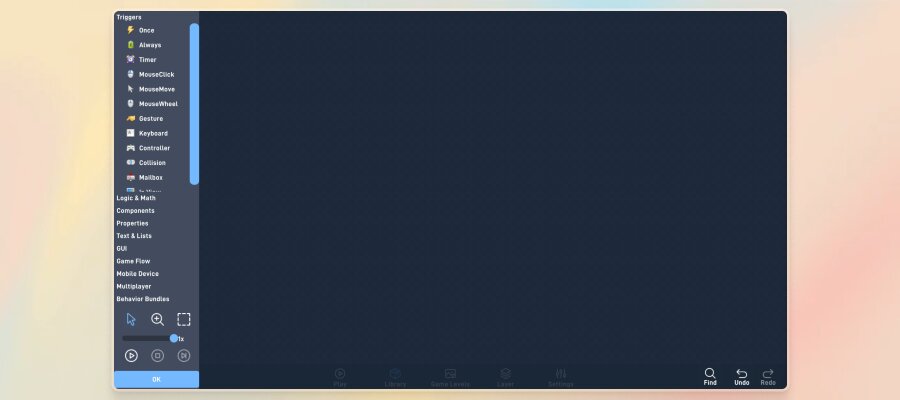
The behavior editor has two main areas:
Left Panel
A menu of all available behaviors, organized into categories (Triggers, Logic & Math, Components, and more). Tool buttons, the speed slider, and the play button are at the bottom.
Workspace
The large area on the right where you build your logic by placing and connecting behaviors. Find, undo, and redo buttons are in the bottom right corner.
Your First Behavior: Making Something Happen
Let’s make an object follow your mouse cursor. This only takes two behaviors!
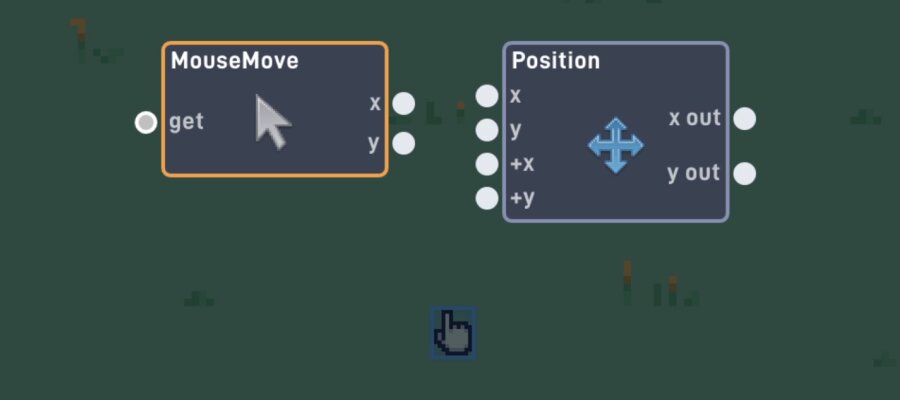
- In the left panel, find the Triggers category and click “Mouse Move”. A Mouse Move behavior block appears on your workspace.
- Find the Properties category and click “Position”. A Position block appears next to the Mouse Move.
- Now connect them. We’ll cover exactly how in the next section.
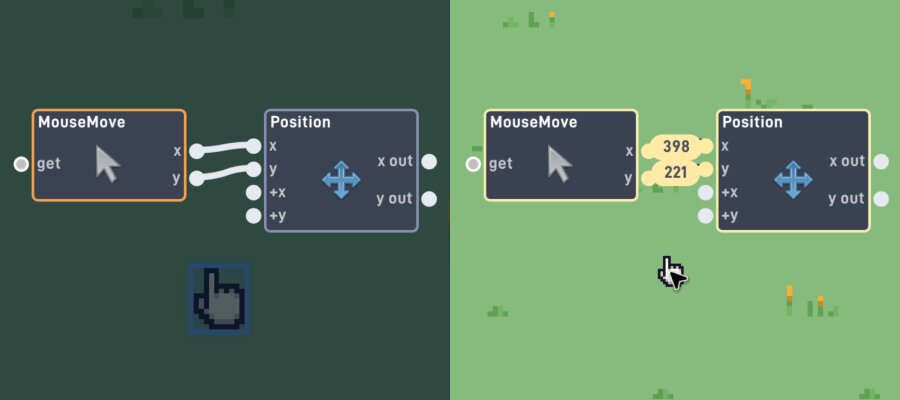
Right now you have two behaviors sitting on your workspace, but they’re not connected. They don’t know about each other. The Mouse Move block is tracking your cursor position, and the Position block can set where your object is, but nothing links them together yet.
That’s it. No settings to configure! The Mouse Move outputs the cursor’s X and Y coordinates, and the Position inputs set the object’s X and Y location. Once they’re linked, the object will follow your mouse wherever it goes.
Connecting Behaviors with Links
Every behavior block has small dots on its left and right sides. These are called ports.
Ports on the left
Inputs — where signals come in
Ports on the right
Outputs — where signals go out
To connect two behaviors:
- Click on an output port (right side of a behavior)
- Drag toward an input port (left side of another behavior)
- When the link turns green, you can release. The connection is made!
To remove a link you don’t want, just click on it.
Now your two behaviors are linked. When you move your mouse, Mouse Move sends the cursor’s X and Y coordinates through the links to Position, which moves the object to match. Press play and try it out!
How Logic Flows
Here’s one of the most important ideas in Flowlab: logic flows from left to right, like reading a sentence.
Every behavior chain starts on the left with a Trigger — something that detects an event in your game (a key press, a collision, the game starting). When that event happens, the trigger sends a signal out through its output port, along the connecting link, and into the next behavior’s input port.
That behavior does its job (plays a sound, moves the object, checks a number), and then sends a signal out its own output to whatever comes next. This keeps going, link by link, until the chain ends.
Think of it like dominoes: when the first one falls, it knocks over the second, which knocks over the third, and so on.

What if one output connects to multiple behaviors? They activate from top to bottom, like reading lines on a page. The behavior closest to the top of the workspace activates first, then the one below it, and so on.
Triggers: How Things Get Started
Triggers are special behaviors. They’re the only ones that can start a chain on their own. They sit on the left side of your logic and listen for something to happen in the game.
Here are the triggers you can use:
| Trigger | What It Detects | |
|---|---|---|
| Always | Activates every single frame (60 times per second!), used for continuous actions | |
| Once | Activates one time when the game level starts | |
| Keyboard | Activates when a specific key is pressed or released | |
| Mouse Click | Activates when the mouse button is clicked | |
| Mouse Move | Activates whenever the mouse moves, with the cursor’s X and Y position as outputs | |
| Mouse Wheel | Activates when the mouse wheel is scrolled up or down | |
| Controller | Activates when a gamepad button is pressed or a stick is moved | |
| Gesture | Activates on touchscreen gestures like taps, swipes, and pinches | |
| Collision | Activates when this object bumps into another object | |
| Sensor | Activates when another object enters or leaves a region around this object | |
| Timer | Activates after a set amount of time passes | |
| Mailbox | Activates when this object receives a message from another object | |
| In View | Activates when this object enters or leaves the screen | |
| Locked Mouse | Captures the mouse cursor and reports its motion as X/Y deltas each frame | |
Every chain of logic needs a trigger to get it started. If a behavior isn’t connected to a trigger (directly or through other behaviors), it will never activate.
Sending Data Through Links
Links don’t just send a “go” signal. They can also carry data along with them. This data is usually a number.
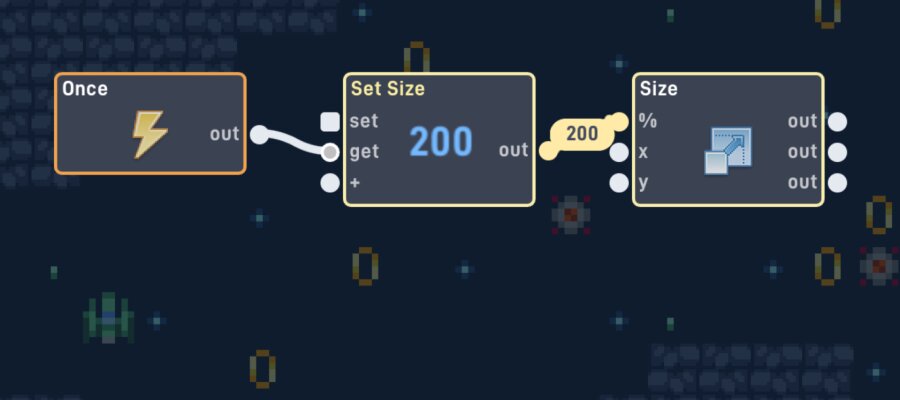
Let’s try an example. We’ll make an object grow to 200% size when the game starts:
- Add a Once trigger (activates when the level starts)
- Add a Number behavior and set its value to 200
- Add a Size behavior (found in Properties)
- Connect Once to the Number’s “get” input, and the Number’s “out” output to the Size’s “%” input
When the game starts, Once activates the Number, which sends the value 200 along the link to Size. The Size behavior receives that number and scales the object to 200%. The key idea here is that the number 200 travels through the link from Number to Size. The link carries the data, not just a “go” signal.
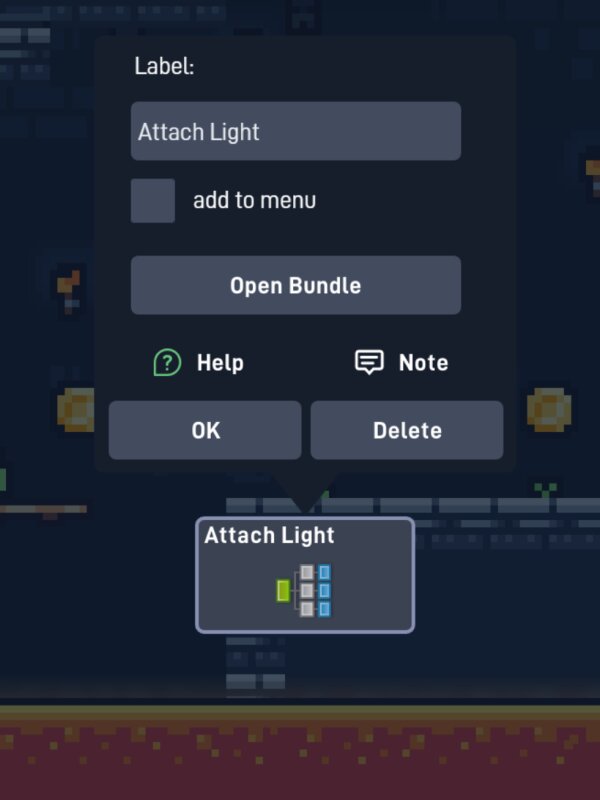
Configuring Behaviors
Every behavior has settings you can customize. Click on any behavior block to open its properties panel.
What you can configure depends on the behavior:
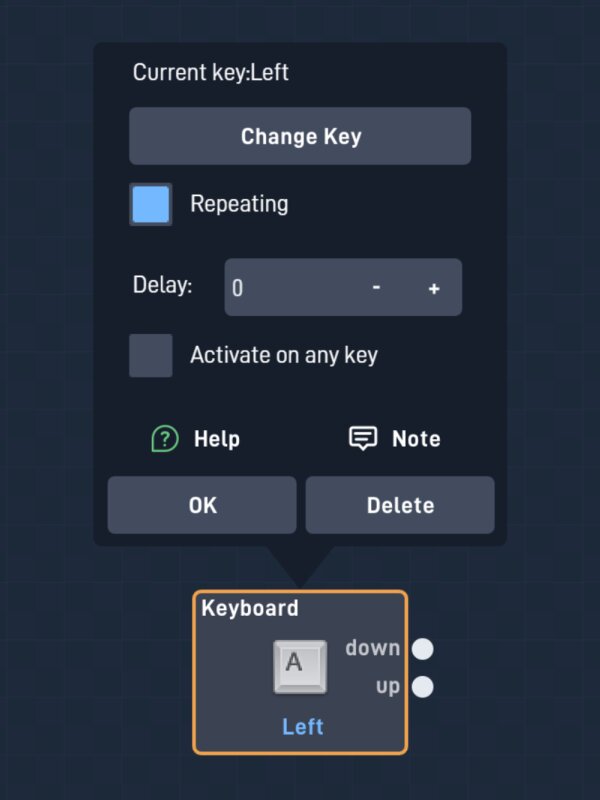
- Keyboard: Which key to listen for
- Timer: How long to wait before firing
- Sound: Which sound effect to play
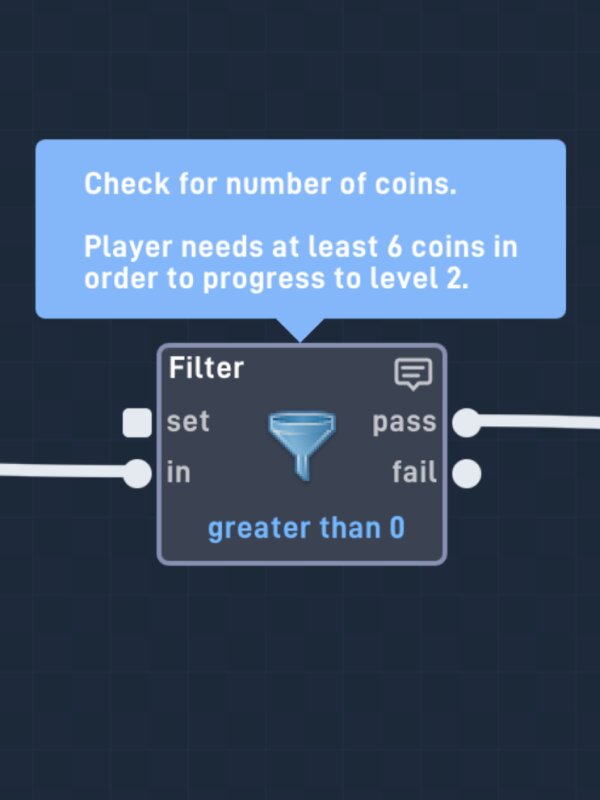
- Filter: What comparison to make (greater than, less than, equals)
At the bottom of every properties panel is a Delete button to remove that behavior and all its links.
Remember the ( ? ) button. It’s in every properties panel and opens detailed documentation with a video demo for that behavior.
Making Decisions
Games need to make decisions: Is the score high enough to win? Is the player’s health at zero? Did the player pick up the right key?
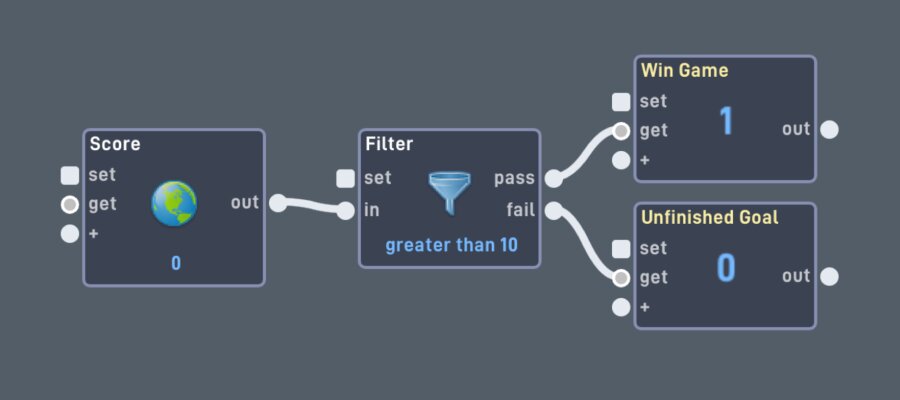
![]() The Filter behavior is the most important tool for making decisions. It takes in a number and asks a question like “is this greater than 5?” Based on the answer:
The Filter behavior is the most important tool for making decisions. It takes in a number and asks a question like “is this greater than 5?” Based on the answer:
Yes → “pass” output
The signal continues down the pass path
No → “fail” output
The signal goes down the fail path instead
Example: Check if the score is greater than 10 to win the game.
Other Decision-Making Behaviors
 Switch
Like a light switch. Turn it on or off to block or allow signals through
 Toggle Switch (Flip Flop)
Alternates between two outputs each time it’s triggered. Great for on/off mechanics
 Logic Gate
Combines multiple conditions. AND = “both must be true.” OR = “at least one must be true.”
 Router
Lets you choose which of several outputs to send the signal to
Working with Numbers
Numbers are everywhere in games: scores, health, speed, position, time. Here are the key behaviors for working with numbers:
Number
Stores a fixed number value
Expression
Does math! a + b * 2
Random
Picks a random number in a range
Ease
Smoothly transitions between values
Variables: Remembering Numbers
Two special behaviors let your game remember numbers:
 Object Variable
A number that belongs to this specific object. Every copy of this object gets its own value. Use it for things like individual health or ammo count.
 Global Variable
A number that’s shared across your entire game. Every object can read and change it. Perfect for a score counter, number of lives, or any value the whole game needs.
Building Bigger Logic
The real power of behaviors comes from combining simple pieces into complex systems. Each behavior does one small thing, but together they create sophisticated game mechanics.
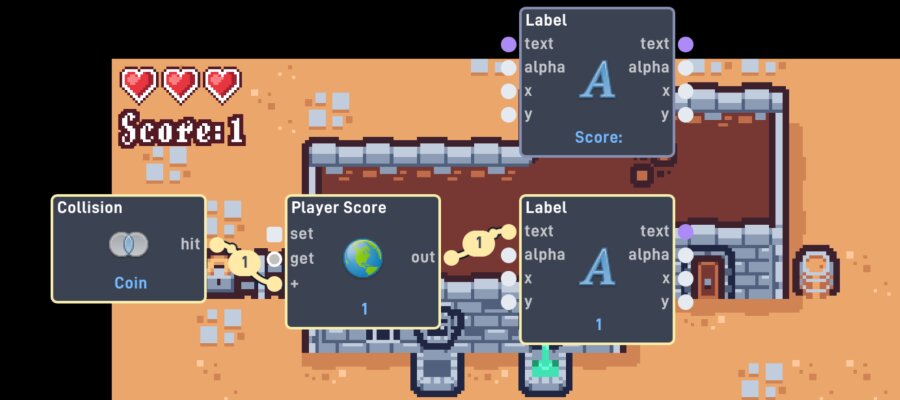
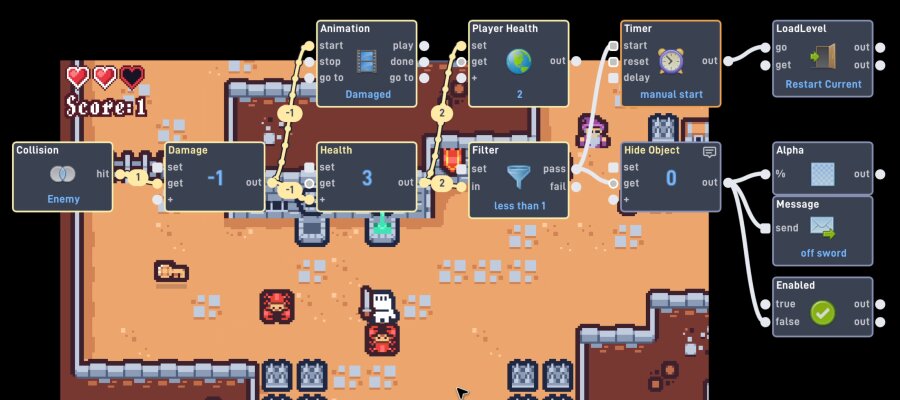
Example: Collecting Coins
Here’s how you might build a coin collection system:
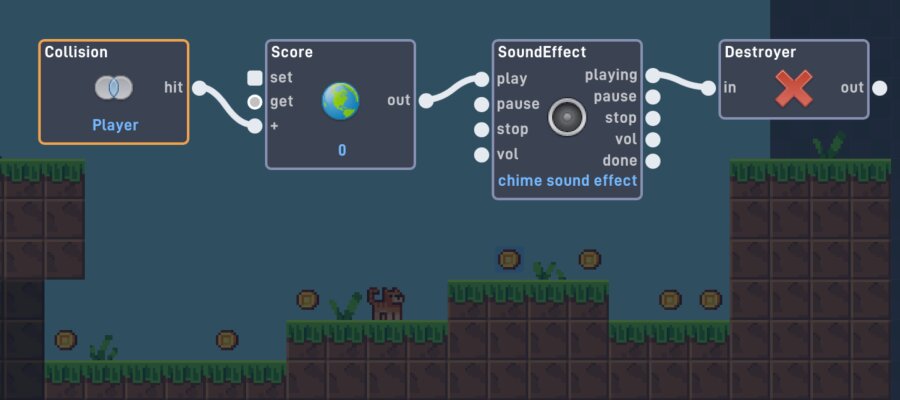
Four simple behaviors, each doing one obvious thing. But together, they create the satisfying experience of collecting coins with sound and a score counter.
Branching
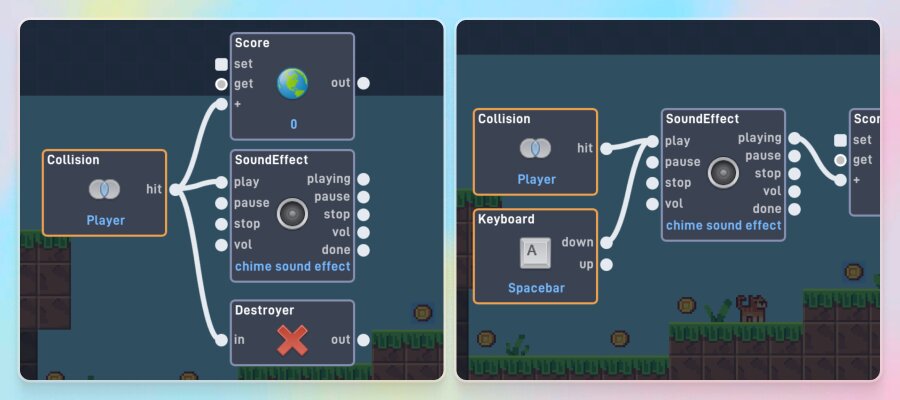
One output can connect to several inputs. After Collision activates, the score updates AND a sound plays AND the coin disappears, all from the same signal.
Merging
Multiple outputs can connect to the same input. Both a Collision and a Keyboard trigger can cause the same sound to play.
Communicating Between Objects
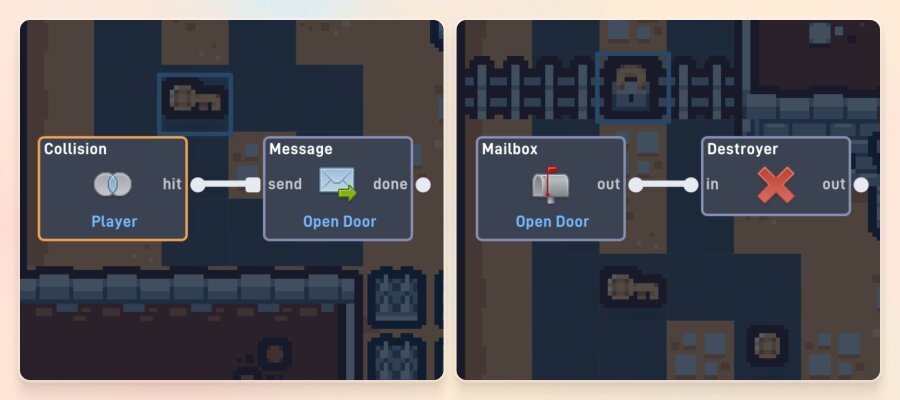
So far, all our behaviors happen within a single object. But what if you need objects to talk to each other? For example, when the player touches a key, you want a door to open.
This is where Message and Mailbox come in:
Key Object
Message — sends a signal to another object type
Door Object
Mailbox — listens for incoming messages
When the player touches the key, it sends a message to all Door objects. Each Door’s Mailbox receives it and triggers the Destroyer to remove the door.
Messages can also carry data. You can send a number or text along with the message.
Testing Your Game
Building a game is all about the build-test-fix cycle:
Build
Add some behaviors
Play
Test your logic
Fix
Adjust what’s wrong
To play your game from the behavior editor, click the Play button. Your game will start running and you can test your logic in action.
Press Escape (or click Stop) to stop playing and return to the editor. Make your changes, then play again.
Debugging with Live Mode
Sometimes your behaviors don’t do what you expect. Maybe your player won’t jump, or your score isn’t counting right. Live Mode lets you watch your logic run in real time so you can see exactly what’s happening.
When you click Play in the behavior editor, your game enters Live Mode. You’ll see:
- Behaviors light up when they activate. Their border highlights to show they’re active
- Links glow and animate to show signals flowing between behaviors
- Values appear on links showing you the actual numbers or text being sent
Speed Control
The speed slider at the bottom of the behavior menu lets you control how fast your game runs:
Step Mode: One Step at a Time
Step Mode is the most powerful debugging tool in Flowlab. Set the speed slider to 0x and you’ll see it change to “Step”.
Now click the Step button to advance your logic one behavior at a time.
With each step, you’ll see:
- Which behavior is executing: it lights up with a highlighted border
- Which link is active: the connecting line glows and animates
- What data is being sent: the actual value appears right on the link
- Where the signal came from: for Mailbox behaviors, you’ll see which object sent the message
Hold the Step button to auto-advance through steps faster. It starts slow and speeds up the longer you hold it.
Step Mode lets you trace the exact path a signal takes through your logic. If something isn’t working, step through it and look for where the chain breaks or where an unexpected value appears.
Common Things to Look For
Working with Text
So far we’ve mostly worked with numbers, but games also need text: player names, dialog, item descriptions, and more.
Text behaviors work just like number behaviors, but they carry words instead of numbers. You can spot text ports by their purple color.
Key text behaviors:
 Text
Text
Stores a text value like “Hello!” or “Game Over”
 Label
Label
Displays text on screen for the player
To Number
Converts text into a number (“42” → 42)
Text Length
How many characters are in the text
Text Compare
Checks if two texts are the same
Text Case & Sanitize
Change case or clean up text
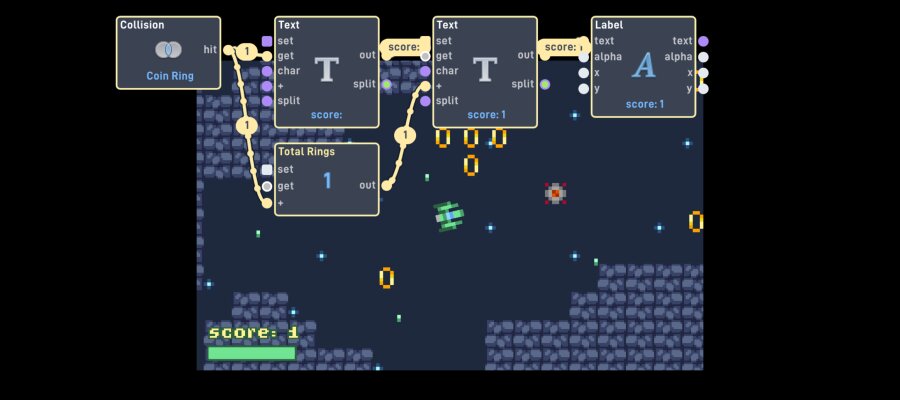
Example: Connect a Global Variable (your score) to a Label that shows “Score: 42” on screen. The Label can combine text and numbers to create a display.
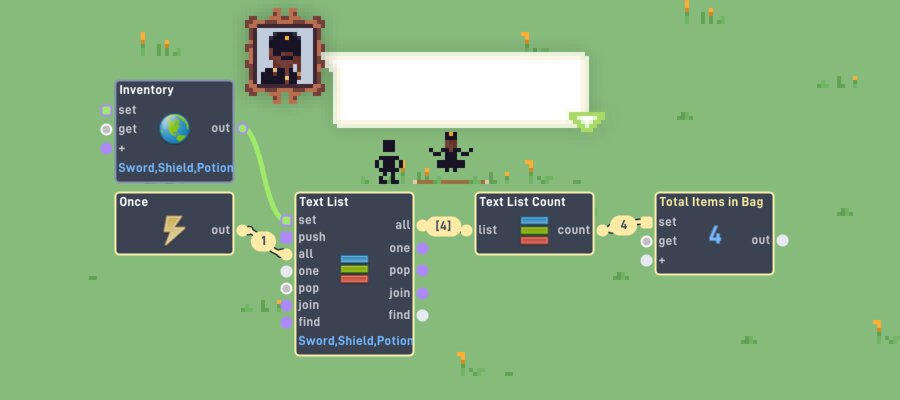
Working with Lists
A List is a collection of values, like a backpack that can hold multiple items.
 Number List
Holds multiple numbers (e.g., high scores: 100, 85, 72, 50)
Text List
Holds multiple text values (e.g., inventory: “Sword”, “Shield”, “Potion”)
List ports are shown in green, so you can easily tell them apart from number and text ports.
List Modify
Add or remove items
List Order
Sort or shuffle
List Each
Do something with each item
List Count
How many items?
Example: Random Enemy Spawner
Create a Text List with enemy type names. Use Random to pick an index and pull out that name to spawn a different enemy every time!
Example: Inventory System
Use a Text List to track collected items. List Modify adds them, List Count checks how many, List Each displays them all.
Port Types and Compatibility
Flowlab uses colors to help you connect the right ports together:
| Port Color | Data Type | Example |
|---|---|---|
| White | Number | Score, speed, position |
| Purple | Text | Names, messages, labels |
| Green | List | High scores, inventories |
| White with gray center | Any | Adapts to whatever you connect |
“Any” type ports are special. They adapt automatically to whatever you connect to them. If you connect a number output to an Any input, it becomes a number port. Connect text instead, and it becomes a text port. They’re flexible by design.
You don’t need to memorize which types are compatible. When you drag a link from an output port, incompatible input ports will automatically dim out. Only the ports that can accept that type of data stay bright. The editor won’t let you create an invalid link, so just drag and connect. If it lights up green, it works!
Port Shapes: Round vs. Square
You may also notice that ports come in two shapes:
Round ports
Activate the behavior and trigger its outputs. When a signal arrives at a round input port, the behavior runs, does its job, and sends signals out. Most ports you’ll work with are round.
Square ports
Do not activate any outputs. They may still cause an effect (like storing a value or selecting a route), but the signal stops there. Nothing gets sent out to the next behavior in the chain.
For example, the Number behavior has a round “get” input and a square “set” input. Sending a signal to “get” makes it output its stored value. Sending a value to “set” changes the stored number, but doesn’t trigger any output. It just remembers the new value for next time.
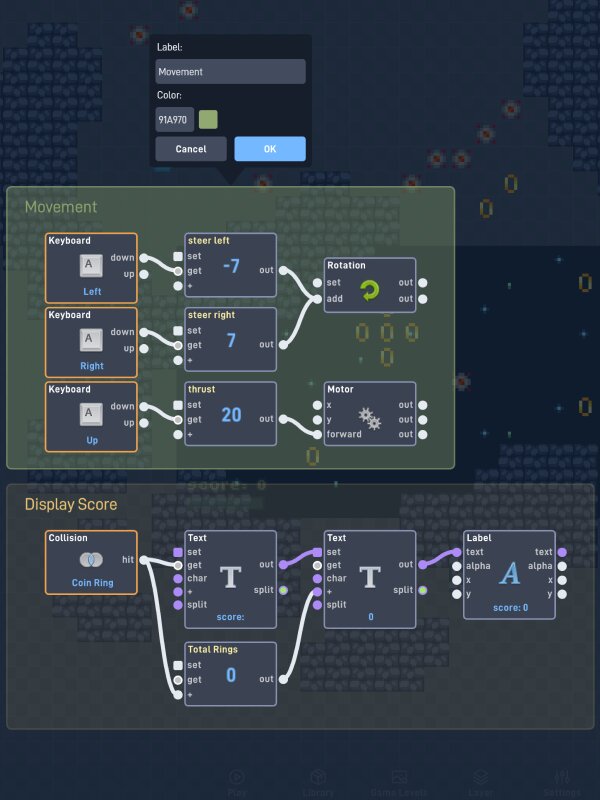
Staying Organized
As your game grows, your behavior workspace can get crowded fast. A few behaviors for movement, some for scoring, a bunch for enemy AI. Before you know it, you’re staring at a tangled web of blocks and links. Here are three tools that will keep things manageable.
Frames
A Frame is a colored rectangle you can place behind a group of behaviors to visually organize them. Think of it like drawing a box around related notes on a whiteboard.
To add a Frame, select the behaviors you want to group and choose “Add Frame” from the wheel menu that appears.
Once you have a frame, you can:
- Name it to describe what that group does (like “Player Movement” or “Score System”)
- Color it to make different sections stand out
Frames also let you move behaviors as a group. When you drag a frame, all the behaviors inside it move together. Just grab the frame and slide the whole group to a new spot.
Frames don’t change how your behaviors work. They’re purely visual. But they make a huge difference when you come back to your game later.
Bundles
When you find yourself building the same logic over and over, or when a section of your workspace gets really complex, you can wrap behaviors into a Bundle.
A Bundle takes a group of behaviors and collapses them into a single block. It’s like putting a bunch of parts into a box with a label on it.
- Select the behaviors you want to group together
- Choose “Create Bundle” from the wheel menu that appears
- Give your Bundle a descriptive name
Bundles have their own inputs and outputs, just like any other behavior. You define which ports appear on the outside.
Organize
Collapse complex logic
Reuse
Use in multiple places
Read
Keep workspace clean
Notes
Even with Frames and Bundles, you might look at a behavior a week later and think: “Why did I set this Filter to greater than 3?” That’s where Notes come in.
Every behavior has a Notes field in its properties panel. Click on any behavior, and you’ll find a place to type a short note explaining what it does or why you set it up that way.
Good notes answer the question “why?” not just “what”:
Instead of:
“Checks if value is greater than 3”
Try:
“Player needs at least 3 coins to unlock the secret door”
Notes don’t affect how your game runs. They’re just for you. Your future self will thank you!
Keyboard Shortcuts
Here’s a quick reference for all the keyboard shortcuts available in the behavior editor. Learning even a few of these will speed up your workflow.
Tools
| Shortcut | Action |
|---|---|
| V | Switch to Pointer tool |
| S | Switch to Select tool |
| Z | Switch to Zoom tool |
| A | Add a behavior at the cursor position |
| F | Open the search/find bar |
| Space (hold) | Temporarily pan the workspace (release to return to previous tool) |
Editing
| Shortcut | Action |
|---|---|
| Ctrl+Z / ⌘+Z | Undo |
| Ctrl+Shift+Z or Ctrl+Y | Redo |
| Delete or Backspace | Delete the behavior under the cursor, or all selected behaviors |
| Shift (hold while dragging) | Drag a single behavior on its own, leaving connected behaviors in place |
Search Bar (when open)
| Shortcut | Action |
|---|---|
| Enter | Jump to the next search result |
| Shift+Enter | Jump to the previous search result |
| Escape | Close the search bar |
Zooming
| Shortcut | Action |
|---|---|
| Mouse wheel scroll | Zoom in and out |
| Zoom tool + click (no drag) | Reset to 100% zoom and center the view |
| Zoom tool + drag | Drag to zoom in or out continuously |